Heading out the door? Read this article on the new Outside+ app available now on iOS devices for members! Download the app.
When asked what pose she would practice if she were limited to just one a day, Geeta Iyengar, B.K.S. Iyengar’s daughter and a principal teacher at the Ramamani Iyengar Memorial Yoga Institute, replied, “An inversion.” The benefits of practicing inversions are vast. Salamba Sarvangasana (Supported Shoulderstand) is thought to promote good blood circulation, calm the nerves by stimulating the parasympathetic nervous system, decrease depression and anxiety symptoms, ease fatigue, and improve immune function. In general, asanas that position the head below the heart or the feet above the heart bring harmony to body and mind and should be considered a crucial component of any yoga practice.
Salamba Sarvangasana is a powerful pose to practice for gradually and safely learning inversions. It’s an essential yoga asana, one that you’ll practice for years to come—even after you’ve mastered it.
Although the word sarvangasana translates as “all limbs pose,” the posture is commonly referred to as Shoulderstand because your body weight rests on the top outer edges (the bony parts) of your shoulders. Blankets for the shoulders make it possible for the neck to be free to lengthen and get a mild stretch, while the rest of the body lifts straight up in one line. The blankets also prevent you from putting pressure on the delicate vertebrae in your neck. Without this propping, the pressure can, over time, flatten the neck’s natural curve.
Start with three stacked blankets. If, while in the pose, you find that you stand on the backside of your shoulders and upper back or on the inner edges of your shoulders, try adding another blanket or two to the stack. It’s important to center yourself on the blankets, not turn your head, and look gently toward your chest to avoid injuring your neck. Directing your eyes toward your chest also keeps the pose calm and your neck soft, and may lessen the tendency for the blood pressure to rise.
The first variation at a wall builds a foundation that begins with the proper placement of the shoulders and upper back, and an opening of the chest. Here, you can also work on outwardly rotating your upper arms and bringing your outer shoulders closer to each other while lifting the upper back, sides of the chest, and tailbone away from the floor.
One challenge of Shoulderstand is entering the pose. It’s easiest to position your shoulders, arms, and back for Shoulderstand while in Halasana (Plow Pose), so the second variation at a wall uses a Plow Pose modification to prepare you for going up into the final pose in the middle of the room.
If you find the wall variations challenging, continue to work on them until you feel stable and strong. You can also try using the variations to enter full Sarvangasana. In the beginning, you may be able to hold the variations and final pose for a minute or two. You can gradually build up to 5 minutes, and eventually to 10 to 20 minutes. For those who already practice Sarvangasana, these variations will refine your understanding and skill, and may boost your ability to stay longer in the pose. After practicing any of the variations of Sarvangasana, rest on your back for a few moments before you sit up.
Pose Benefits:
- Calms nerves
- Reduces anxiety, insomnia, and irritability
- Aids digestive disorders
Contraindications:
- Menstruation
- High blood pressure
- Glaucoma
- Detached retina
- Pregnancy
Walk This Way

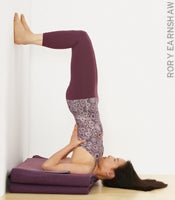
In this first variation, the feet press onto a wall, which takes some weight off the shoulders and gives the upper arms and shoulders a moment to rotate outward and the chest to open.
Begin by placing your mat against a wall. Stack four blankets on top of the mat and make sure that the folded edges will be underneath your shoulders. Fold half of your mat over the blankets and bring your setup a few inches from the wall. You want to position yourself at the right distance away from the wall so that your thighs are perpendicular to the floor and your shins are parallel to the floor.
Lie on your back with the tops of your shoulders a couple of inches in from the edge of the blankets, closer to the wall. Let your head rest on the floor behind the blankets so that it’s lower than your shoulders. Bend your knees 90 degrees and place your feet on the wall, shins parallel to the floor. If your entire back can’t rest on the blankets and your torso curls into a ball, you’re too close to the wall.
Press your heels lightly into the wall—and isometrically drag them down toward the floor—to lift your pelvis up. Clasp your hands under your body and straighten your arms. Rotate your upper arms out to roll the outer edges of your shoulders down. Lift the inner edges of your shoulders, trapezius muscles, and shoulder blades away from the blankets and toward your low back. If your shoulders feel stuck, lean to the right to rotate the left arm and shoulder out more, and then lean to the left to rotate the right upper arm and shoulder out.
Once you feel as though you’re high on your shoulders’ tops, lift the sides of your chest and pelvis up toward the ceiling. Lift your buttocks away from your lower back until your torso is perpendicular to the floor. To open your chest, move your back ribs forward. Some weight will be on your head, and you might feel as though you want to push the back of your head into the floor. Instead, allow the back of your neck to lengthen as you lift your spine up away from the floor. Relax your jaw and throat and look toward your chest.
Release the clasp of your hands and turn your upper arms out. Don’t let your elbows splay apart as you bend them, and take your hands toward your upper back. While bending your elbows, you’ll have to work to roll your outer shoulders down and turn your arms out. To do that, think of rotating your biceps from the inside out toward your triceps and rolling your triceps down into the blanket and closer to each other. Place your hands as high on your back (close to the floor) as possible to support the lift of your upper back off of the floor. Use your hands to help guide your back ribs forward and support the opening and lifting of your chest. Don’t let your buttocks and tailbone sink back toward the wall; lift your pelvis so it’s in line with your shoulders. Lift your heels and press your toes into the wall to bring your pelvis farther away from the wall.
Breathe normally and hold this position for up to a minute. On an exhalation, gently release your hands and lower yourself down to rest on the blankets. Then slide away from the wall until your shoulders come off of the blankets to rest on the floor. Keep your knees bent and stay on your back for a few moments.
Moving On Up

Practicing Halasana with a wall to support your feet makes it easier to adjust your shoulders and come into Shoulderstand with good alignment. Turn your blanket and mat setup 180 degrees so that now the folded edges of your blankets face the wall. Place your blankets leg distance from the wall. To measure that, sit on the floor next to your blankets in Dandasana (Staff Pose) with your soles touching the wall, and place the folded edge of your blankets in line with your hips. Place a bolster behind the blankets.
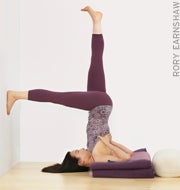
Face away from the wall, and lie down on the blankets with your head on the floor and pelvis over the bolster. Turn your upper arms out and broaden your chest. Press your hands on the bolster by your hips, bend your knees toward your chest, and roll onto your shoulders to take your feet overhead to the wall behind you, legs parallel to the floor. If you have tight hamstrings, walk your feet higher up the wall.
Look toward your chest, stretch your arms away from the wall, and rotate your upper arms out, with palms facing away from each other as you roll onto the outer edges of your shoulders. Lift the upper back, sides of the torso, and shoulder blades away from the floor. Straighten your legs and lengthen your buttocks toward your heels on the wall. Bending your elbows, take your hands to the upper back to scoop it away from the floor and to broaden your chest. Relax your throat and jaw as you look toward your chest.
Lift your left foot off the wall and extend it toward the ceiling until your left leg is perpendicular to the floor. Straighten your left leg and pull it up to help lift the whole left side of your torso. Keeping your right leg straight, foot pressing into the wall, lift the right side of your rib cage and torso so that the sides of your waist are even. Now lower your left leg, walk your hands up your back, and change sides. This will give you the feeling of lift and extension through your legs that’s required for doing the final version of Shoulderstand.
To come out of the pose after a minute, take both feet back to the wall. Stretch your arms overhead, palms facing up, and look toward the wall as you slowly roll down—first onto your upper back, then onto your middle and lower back. When buttocks are on the bolster, bend your knees and place your feet on the floor.
Off the Wall

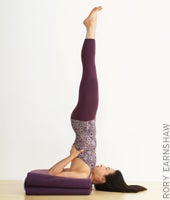
Bring your mat and stack of blankets to the middle of the room. Lie down on the blankets and place your hands beside your hips on the floor. Bend your knees and take your legs into Halasana so your feet touch the floor behind you. If your feet don’t reach the floor, use the wall or a chair to support them. Adjust your arms and shoulders, then take your hands to your back. Come into the pose one leg at a time to maintain the lift of your rib cage. (If you lift both legs at once, you might harm your shoulders and neck.) When you lift your right leg, straighten your knee and extend your leg strongly toward the ceiling to pull your torso up. Raise your left leg. Lift the fronts of your thighs straight up and away from your pelvis.
When you’re up, continue adjusting your hands by walking them up your back toward the floor to prevent your upper back from sinking and to lift the sides of your chest. Broaden the chest as you roll your outer shoulders down and pull the elbows in toward each other. If they splay apart, try looping a strap around your upper arms, just above your elbows.
Raise your buttocks toward your heels as you lengthen your inner thighs and reach up through the balls of your big toes. Breathe normally and coordinate the actions of the pose so that you grow from the base at your arms and shoulders up through your legs to your toes.
Although you are working the entire body, let your throat and tongue be soft. Practice coming down into Halasana. Through regular practice, you can stay in the pose longer without strain. After Sarvangasana, you should feel calm and quiet, as if all of the systems of your body are awakened and now able to rest.
Marla Apt is an Iyengar Yoga teacher living in Los Angeles.